A downloaded 3D LUT often arrives with little context. It is a small file with a name someone else chose, created for footage you have never seen and conditions you know nothing about. Applying it to your project without checking its intended use can produce unpredictable results.
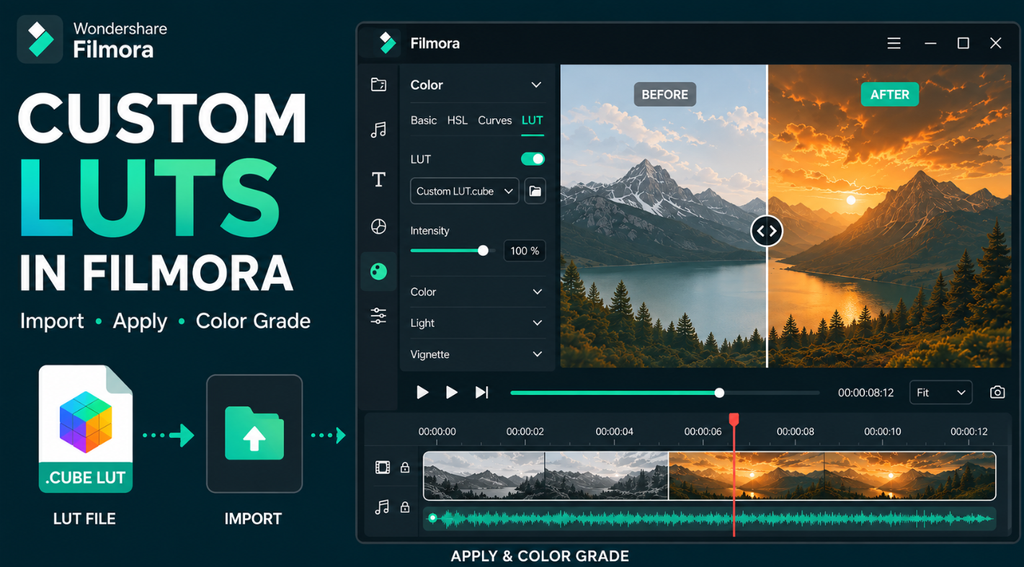
A quick evaluation removes much of that uncertainty. This guide explains how to identify what a 3D LUT was designed for and import it into Wondershare Filmora. It also covers testing it on representative footage and recording which LUT you used.
Part 1. Confirm What the LUT Was Designed For
Most disappointing results come from applying a file to the wrong kind of source. The following 7 things are worth establishing before you import a 3D LUT:
| What to Check | Why It Matters |
|---|---|
| The Creator | A named source usually documents what the pack expects |
| Camera or Color Profile | A file built for one profile will misjudge another |
| Technical or Creative | One normalizes footage, the other imposes a style |
| Required Conversion Order | Some packs assume a conversion has been applied first |
| File Format | Filmora reads .cube, so other formats need converting |
| License Terms | Free for personal use rarely means free for client work |
| Included Instructions | A read me often names the exact input the pack expects |
Keep the original download folder as it is, along with the read me and license file. Months later, you may need those files to remember where the LUT came from and check what the license allows.
Part 2. Select Representative Test Footage
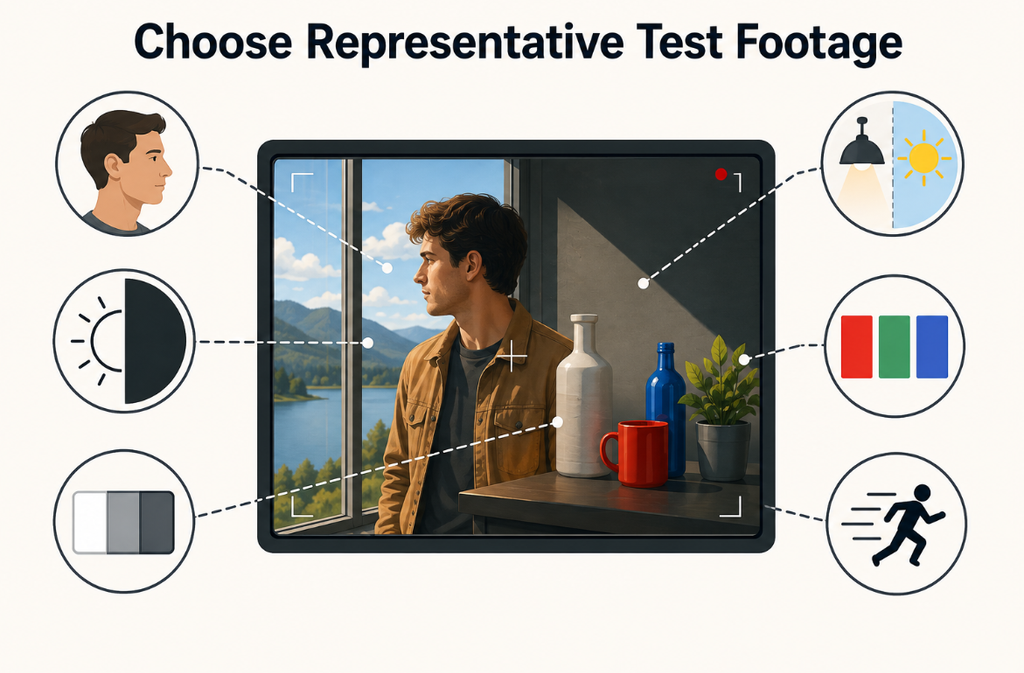
A 3D LUT should be tested on footage that reflects the real challenges in your project, not just your cleanest shot. Choose a short clip that includes the conditions most likely to expose a poor match:
- Natural Skin Tone Reproduction: Include a face if your project has people in it. Skin tones are often the first place an unwanted color shift becomes noticeable.
- Highlight and Shadow Detail: Use footage with both bright and dark areas. This helps you see whether the LUT clips highlights or crushes important detail in the shadows.
- Neutral White or Gray Reference: Include something white or gray in the frame. A neutral reference makes an unwanted color cast much easier to notice.
- Saturated Color Handling: Look for strong reds, blues, or greens in the footage. These colors help show whether the LUT is pushing saturation beyond a believable level.
- Color Stability During Movement: Play footage with some movement rather than judging a still frame alone. Banding, noise, or inconsistent color can become more noticeable once the image moves.
- Project-Matching Lighting Conditions: Test footage shot under lighting similar to your actual project. A LUT that works well indoors may not produce the same result outdoors.
Part 3. Import the Custom LUT into Filmora
For any 3D LUT Filmora did not ship with, the import process stays the same. Using the Filmora 3D LUT tool, you can load an external LUT, apply it to your footage, and fine-tune its strength. These 5 steps cover the process from file to preview.
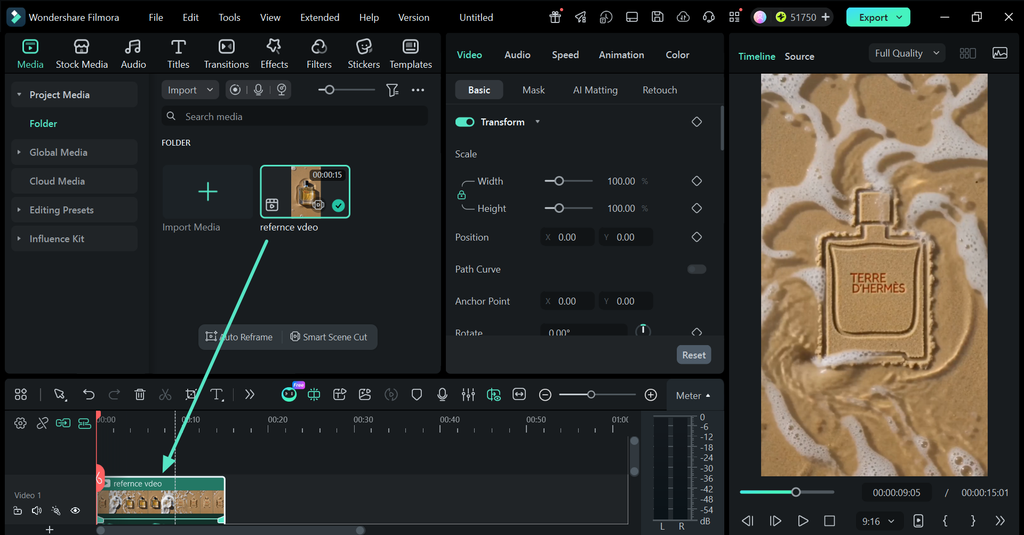
Step 1. Add the Test Clip and Select It
Drop your representative clip onto the “Timeline” and click it, so its properties load in the panel on the right.
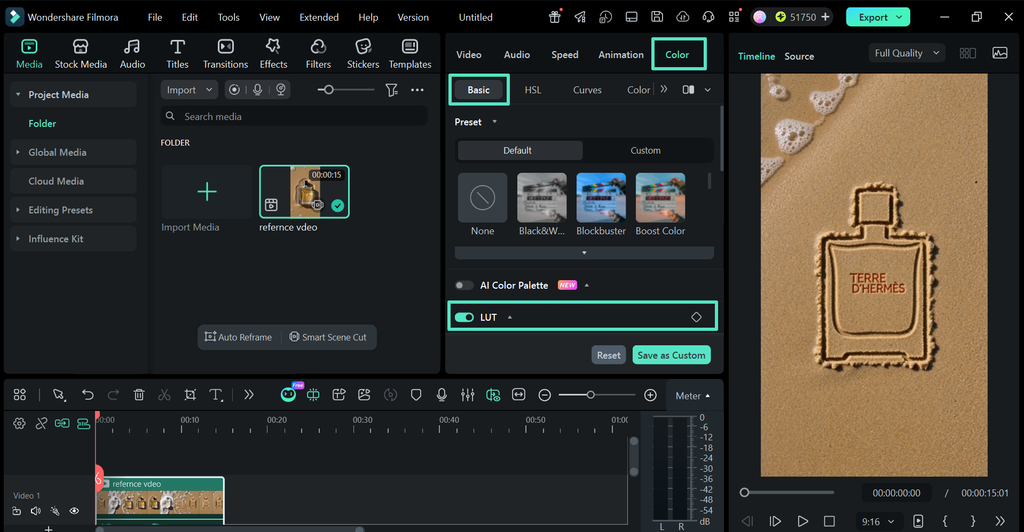
Step 2. Open Color and Enable LUT
Switch to the “Color” tab and open the “Basic” section, then turn on the “LUT” option. The preset list and its controls appear underneath.
Step 3. Choose Load New LUT
Open the “Preset” menu and look for the “Import LUT” option to load a new file, which sits alongside the built-in presets. This points Filmora to your own drive.
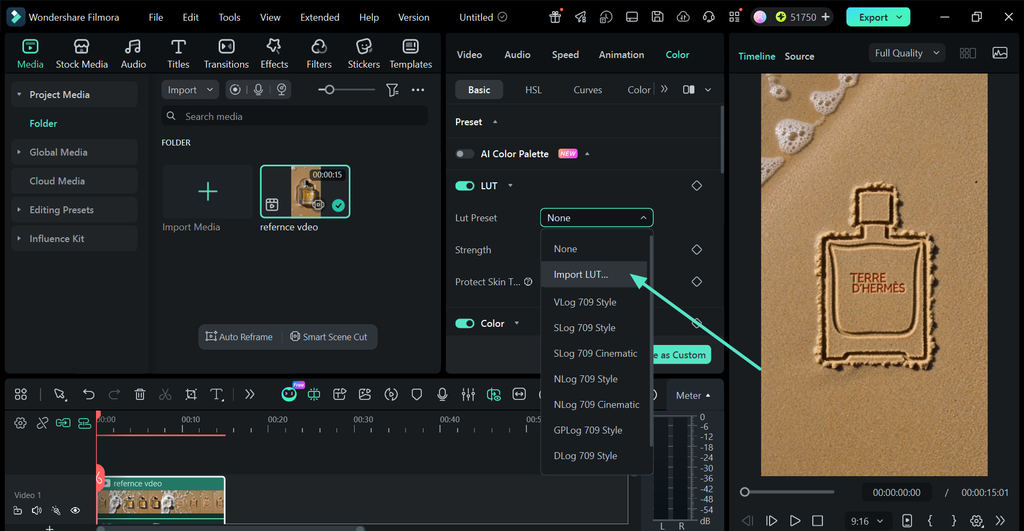
Step 4. Select the File and Apply It
Browse to the “.cube file” in your download folder and confirm. The preview updates immediately, and the file joins your preset list for reuse.
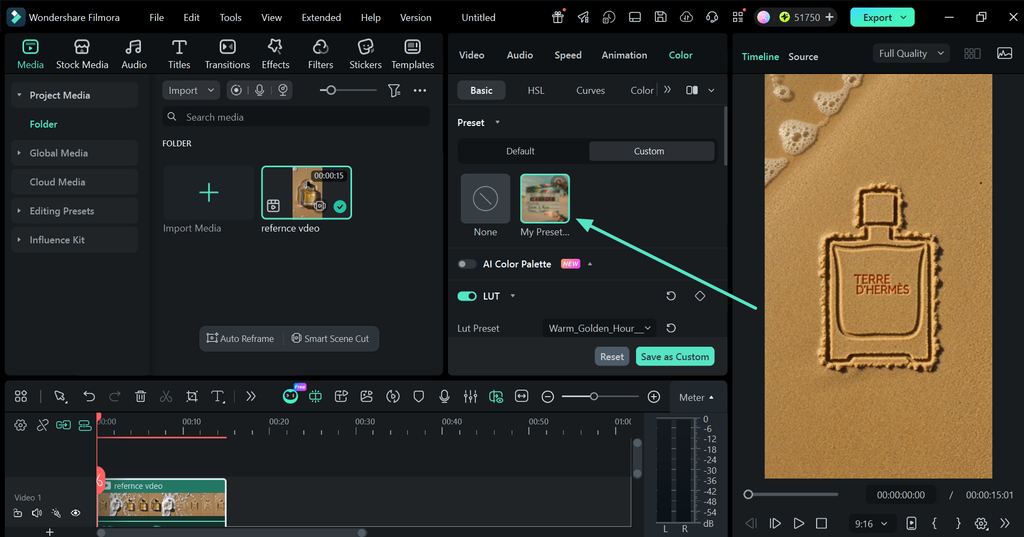
Step 5. Set the Strength and Preview
Pull the “Strength” slider back from full, then move the playhead through several points in the clip. An imported file deserves more skepticism than a built-in one, because nothing about it was tested against your footage.
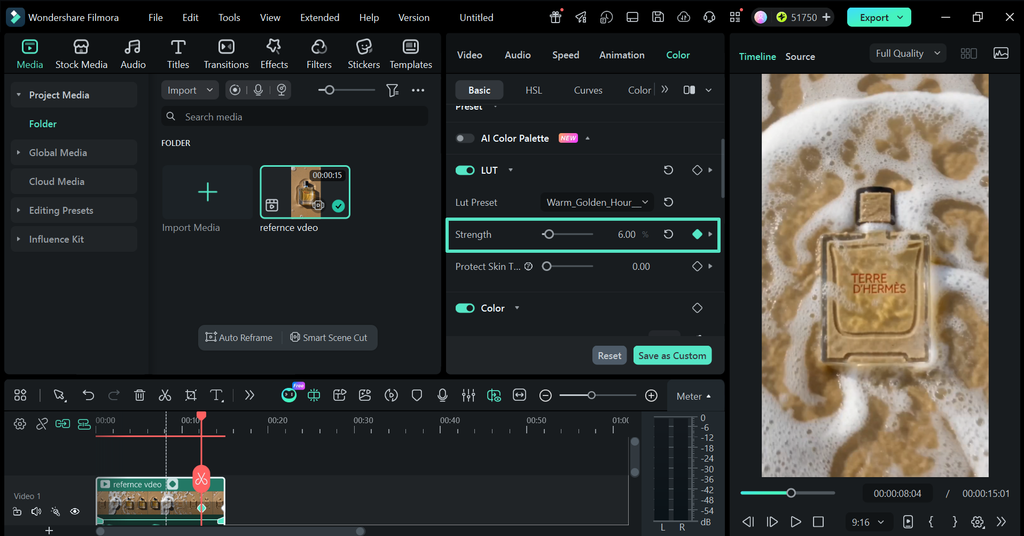
Note: Imported files are managed under editing presets, where thumbnails make them easier to identify. Removing one from Filmora does not delete the original from your computer.
Part 4. Evaluate the Imported LUT
Once your 3D LUT is applied, check whether it actually suits the footage rather than judging the initial look alone. Your eyes adapt to color changes quickly, so using both visual checks and scopes gives you a more reliable comparison.
Check It With Your Eyes
Look at the faces first, then any white or gray object in the shot. Check that bright areas keep texture, dark areas retain detail, and saturation still looks plausible. For a broader approach to balancing footage, see the Filmora color correction guide.
Compare a few shots from the same sequence as well. A suitable LUT should produce reasonably consistent results across the footage rather than working on one chosen frame.
Check It With the Scopes
Filmora carries 4 video scopes, reached from the button at the top right of the preview. The Vectorscope reads skin tone and saturation, while the Waveform shows brightness and where the picture is clipping. The Histogram and Parade cover distribution across the channels.
A split-screen preview provides another useful check. Comparing the treated and untreated frames side by side makes unwanted shifts in color, contrast, or exposure easier to notice.
Part 5. Record the LUT Used in the Project
Once you have tested and approved a 3D LUT Filmora, document the final setup before moving on. Color choices are surprisingly easy to forget, and a short project note makes it much easier to recreate the same look later.
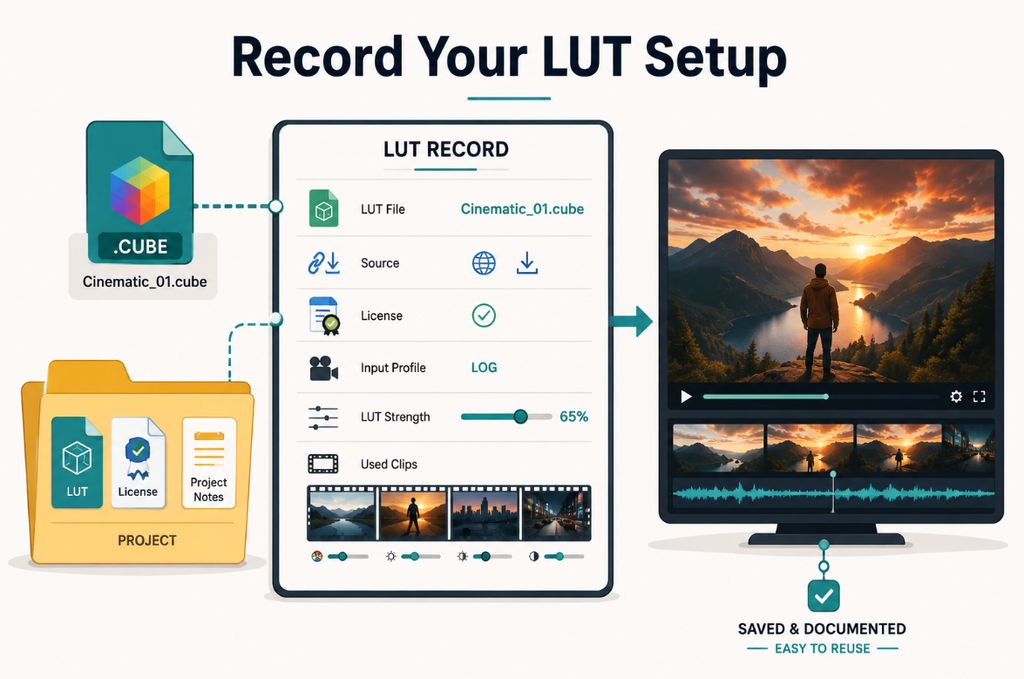
- Exact LUT File Name: Record the complete filename, especially when a pack contains several similarly named variations.
- Original Download Source: Note where the LUT came from so you can find the same file again for another project or episode.
- License and Usage Terms: Save the location of the license in case a client or publishing platform later asks about usage rights.
- Required Input Color Profile: Record the profile the LUT expects to prevent it from being applied to incompatible footage later.
- Applied LUT Strength: Write down the exact strength value rather than trying to reproduce the result by eye.
- Clips and Additional Corrections: Note which clips use the LUT and any color adjustments made before or after it was applied.
Part 6. Importing a LUT Is Not the Same as Creating One
Everything above focuses on importing and testing an existing 3D LUT created by someone else. Creating your own is a different process entirely, and the comparison below shows where the 2 workflows differ:
| Importing a LUT | Creating a LUT |
|---|---|
| Takes a file that already exists | Produces a new file from your own decisions |
| Someone else made the color choices | The choices are yours to make and store |
| Source, license, and profile need checking | Entirely different questions apply |
| Covered by this article end to end | A separate task with its own workflow |
This article focuses only on importing and evaluating an existing 3D LUT. Creating your own LUT involves a different workflow and should be treated as a separate process.
Conclusion
A custom 3D LUT Filmora workflow starts with knowing what the LUT was designed for and testing it on representative footage. Recording the file and settings also makes the look easier to reproduce later. Filmora keeps importing, previewing, and adjusting LUTs in one workflow, making it a practical choice for consistent color across projects.


