Imagine you are fully involved in your digital life and spending time in creating content, storing and managing other data. Whatever you create, the data is stored on your PC hard drive. But suddenly a message pops up warning that your hard drive is nearly full, or your PC is running slow because a single drive is loaded with all types of data, documents and files. And in this situation, you are left with only one option and that is disk partitions.
Making partitions in a computer storage drive might seem boring and risky, especially if it has important things like files and papers. But, if you know how and plan well, you can do this without losing anything important. In this guide, we will show you how to do it in a simple way. We will give you helpful advice, warnings, methods and tools to make sure you can do it properly and without any problems.
What is Hard Drive Partitioning?
“Hard drive partitioning” is like dividing a big room into smaller rooms inside a computer’s storage. It means making different spaces in the storage for keeping different kinds of things. This helps to keep things in order and to find them easily when you need them. It’s like having different drawers in your cupboard for different types of clothes.
Things to consider before proceeding with the Partition process
Making sections in your storage is like breaking it into many parts. These parts can do many things. They can make space for keeping things, set up two different operating systems, or make the best use of storage space. But it’s very important to be careful to avoid any problems.
Before you use tools to make sections in your storage, you must know about the risks and be careful. These tools can help you use your storage space well, but they can also cause problems like losing data or other unexpected issues. That’s why it’s a good idea to save all your important files before you start making sections.
Here are some things you should remember when you are making sections. You can consider these points
Keep Your Files and Data Safe: Before you start making sections, make sure you have saved all your important files and data somewhere safe like another storage device or internet storage service. This will keep your things safe if you make a mistake or lose some data by accident.
Learn About the Tools: Spend some time learning about the tools that help you make sections in your storage. These tools come with your operating system and each one can do different things. Read guides or watch online tutorials to learn about these tools.
Be Careful: When you make sections in your storage, you change its structure. If you do this wrong, it can cause big problems. So, before you start, be sure about what you are doing to avoid losing data by mistake.
Follow System Rules and Tips: Your operating system gives you rules and tips about making sections, like how big each section should be, what format to use, and what works well with your system. Follow these rules to avoid problems.
Ask for Help If You Need: If you feel unsure or if making sections seems too hard, it’s good to ask for help. You can ask people who know about this or look for help in online communities. They can give you advice and guide you.
Keep Your System Updated: Make sure your system is up to date before you start making sections. This is because newer versions of software often have better tools and fewer problems.
Have Enough Power: Be sure your computer has enough power before you start. If your computer turns off in the middle of making sections, it can cause big problems.
Avoid Using the Drive While Partitioning: While making sections, it’s best not to use your storage for anything else. This helps to avoid mistakes or problems.
Do Regular Checks: After making sections, check them regularly to make sure they are working well. This can help you spot and fix any problems early.
Now let’s understand the different methods and tools involved in order to carry out the Partitions process.
Using Built-In Tools for Partitioning
Just like how you use your furniture to divide a big room into smaller areas, Windows also gives you some tools that you can use to divide your computer’s storage. These tools are part of Windows. You don’t need to get them from somewhere else.
They help you break up your computer’s storage into smaller parts. This is like using a cupboard to keep your clothes and a bookshelf for your books. It helps you keep your things in order and makes it easy to find what you need. Just remember to learn how to use these tools properly and be careful when you’re using them. Let me make you understand these tools
Using Disk Management
Disk Management in Windows is like your handy tool chest. You can open your disk management by using Windows key + X or searching it in the Window search box. Then click on “Disk Managementâ€.
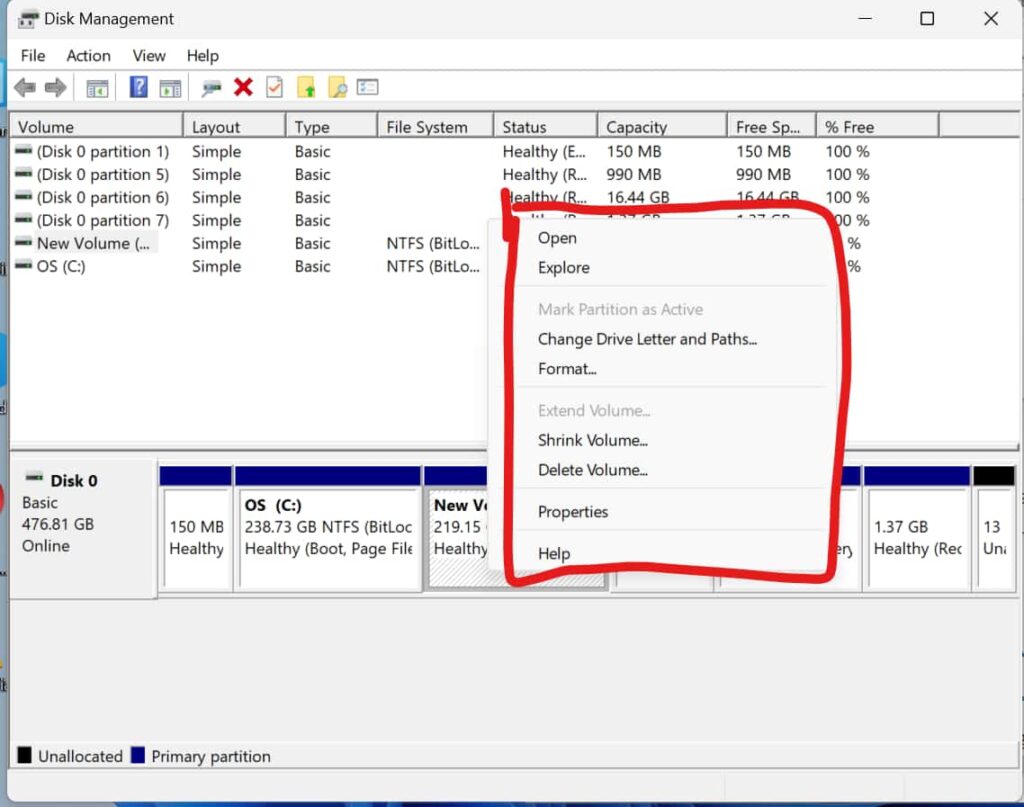
Now, right-click on any disk, and you will see these options.
Extending Volume: Making a section in your storage bigger is like moving a movable wall in your room to make more space. If there is free space around the section you want to make bigger, you just need to click the right button on your mouse and choose “Extend Volume” from the menu. This will do it for you. But, if there’s no free space near the section, you won’t be able to choose this option. It will be grey in appearance and you won’t be able to click on it.
Shrink Volume: Making a section in your storage smaller is like making a section in your room smaller. You can do this by clicking the right button on your mouse on the section and choosing ‘Shrink Volume’. But, remember, you can only make the section half its original size. You can’t make it any smaller than that. So, you need to think carefully about how small you want to make the section.
Delete Volume: Removing a section from your storage is like taking out a part of your room. To do this, click the right button on your mouse on the section you want to remove and choose ‘Delete Volume‘. This will remove the section. But, be careful, because once you remove a section, you can’t get it back. So, make sure you don’t have any important things in that section before you remove it.
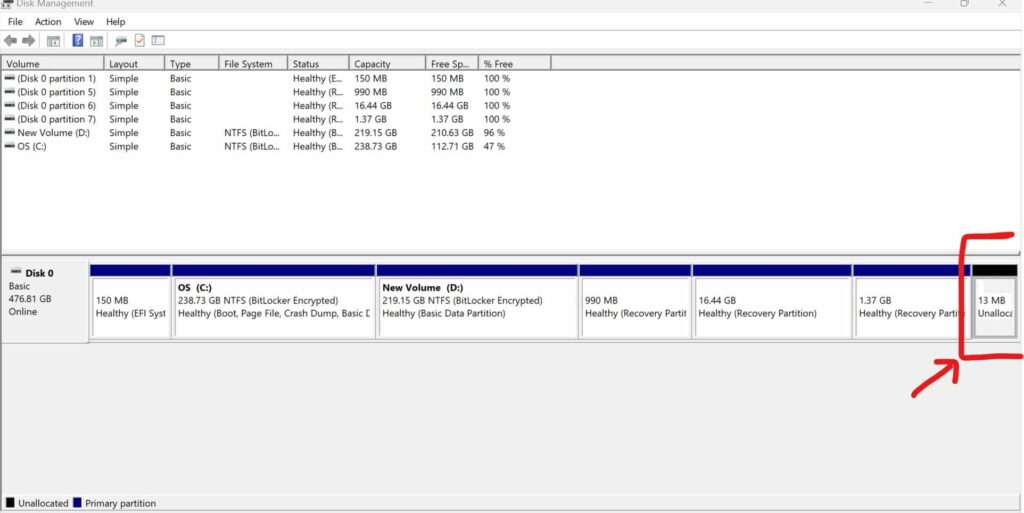
Now let’s know the steps to understand how you can use the unallotted disk space to make partitions.
- Press the Windows key on your keyboard and type “Disk Management” in the search bar.
- You can also use Windows + X key on your keyboard.
- Click on the “Create and format hard disk partitions” option in the search results to open the Disk Management window.
- In the Disk Management window, you will see a list of all the disks connected to your computer.
- Identify the disk on which you want to create partitions.
- Right-click on the unallocated space or free space of the disk and select “New Simple Volume” from the context menu.
- The New Simple Volume Wizard will open. Click “Next” to proceed.
- In the next window, you can specify the size of the partition you want to create.
- You can either use the default maximum size or enter a specific value. Click “Next” when you’re done.
- Now, you can assign a drive letter to the new partition. Choose an available drive letter from the drop-down menu and click “Next“.
- In the next window, you can choose the file system for the partition. It is recommended to use NTFS for most scenarios. Select “NTFS” and click “Next”.
- You can also provide a volume label, which is the name of the partition. Enter a name of your choice or leave it blank to use the default name. Click “Next“.
- Review the settings on the next window and click “Finish” to create the partition.
- The new partition will now be created and formatted. You can view it in the Disk Management window.
- Repeat these steps if you want to create additional partitions on the same disk.
Using DiskPart in Command Prompt

Another built-in tool you can use is DiskPart in the Command Prompt. This is a more direct method, but it’s also more suited for advanced users. Here are the steps:
- Press the Windows key on your keyboard or click on the “Start” button, and type “cmd” in the search bar to open the Command Prompt.
- Right-click on the “Command Prompt” app in the search results and select “Run as administrator” to open the Command Prompt with administrative privileges.
- In the Command Prompt window, type “diskpart” and press Enter to open the DiskPart utility.
- Type “list disk” and press Enter to view a list of all the disks connected to your computer.
- Identify the disk number of the disk on which you want to create partitions.
- Type “select disk X” (replace X with the disk number you identified in the previous step) and press Enter to select the desired disk.
- To create a new partition, you have two options:
- Option 1: Create a primary partition:
- Type “create partition primary” and press Enter to create a new primary partition using the entire available space on the disk.
- Option 2: Create an extended partition with logical drives:
- Type “create partition extended” and press Enter to create a new extended partition.
- Type “create partition logical” and press Enter to create a new logical drive within the extended partition.
- Option 1: Create a primary partition:
- After creating the partition, you can format it by typing “format fs=ntfs quick” (for NTFS file system) or “format fs=fat32 quick” (for FAT32 file system) and pressing Enter. This will perform a quick format.
- Once the format is complete, you can assign a drive letter to the partition by typing “assign letter=X” (replace X with the desired drive letter) and pressing Enter.
- Repeat steps 6-8 if you want to create additional partitions on the same disk.
- When you have finished creating partitions, type “exit” and press Enter to exit the DiskPart utility.
- Finally, you can close the Command Prompt window.
Please note that partitioning and formatting a disk will erase all data on it, so ensure you have a backup of any important files before proceeding. You have to be cautious while using the DiskPart utility to avoid unintended modifications to your disks and partitions.
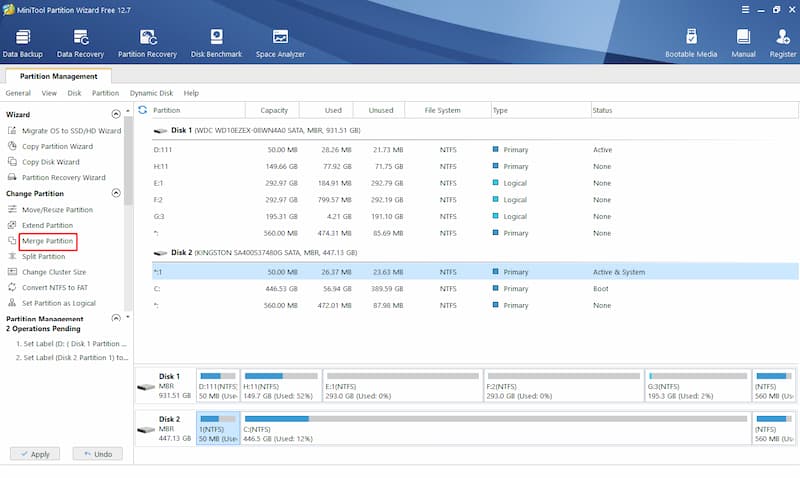
Using MiniTool Partition Wizard
When it comes to organizing and managing your computer’s hard drive, there may arise situations where the built-in tools provided by your operating system may not be sufficient.
This is where third-party partition tools or free partition software can come to the rescue. These tools offer additional features, flexibility, and ease of use, allowing you to efficiently partition your hard drive according to your specific needs.
There are many benefits of using third-party partition tools they offer a wide range of file systems, including popular ones like NTFS, FAT32, and exFAT. It means you can easily work with partitions regardless of the file system format and enjoy interoperability between different operating systems.
These third-party partition tools also provide the option to perform partition operations without the risk of data loss. These partition managers are provided with advanced algorithms and safeguards that minimize the chances of accidentally erasing or corrupting data during partition management tasks.
One of these tools is called MiniTool Partition Wizard.
Extending a Partition with MiniTool Partition Wizard

When your partition is running out of space and you need to extend it, MiniTool Partition Wizard comes to the rescue like a handy expandable room divider:
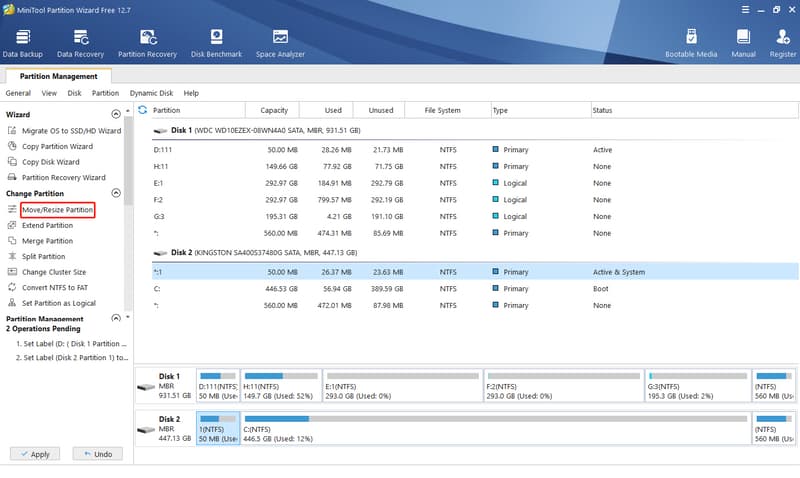
- Run MiniTool Partition Wizard and select the partition that needs extending. Choose ‘Extend Partition‘ from the left action panel or from the right-click menu.
- Open the ‘Take Free Space from‘ drop-down list and choose a partition or unallocated space to take free space.
- Then, decide how much space to take by dragging the sliding handle leftwards or rightwards. Click ‘OK‘ to continue.
- Click the ‘Apply‘ button to apply the changes.
Advanced Options with Third-Party Software like MiniTool
These third-party software also offer additional benefits such as:
Resizing a partition: Install and run the software. Right-click on the volume you want to reallocate, and then select “Resize/Move Partition“. Drag the bar to release some free space. With the unallocated space, you can directly create a new partition.
Moving a partition: You can also use that unallocated space to extend another partition like a C drive. To do so, you can first move the D partition to the right side to make unallocated space contiguous and behind the C drive, and then add it into the C partition.
Merging partitions: With this tool, you can also merge non-adjacent unallocated space into another partition directly no matter where it is located on the disk, or merge two neighbouring partitions into one via the “Merge Partitions” feature.
Concluding Thoughts
Partitioning your hard drive is an efficient way to reorganize its storage, similar to rearranging a room. Windows offers built-in tools, while third-party programs like MiniTool Partition Wizard provide even more options to optimize hard drive space on your computer.
FAQs
What is disk partitioning?
Disk partitioning is the process of dividing a hard drive into separate sections called partitions. Each partition acts as a separate storage unit and this unit allows you to organize and manage your data more efficiently.
Can I resize a partition without losing data?
Yes, it is possible to resize a partition without losing data. By using a good third-party partitioning software, you can adjust the size of a partition to make it larger or smaller, and also preserve the existing data stored within it.
What is the best tool for disk partitioning?
The choice of the best tool for disk partitioning depends on individual choices or needs. Popular options include MiniTool Partition Wizard, EaseUS Partition Master, AOMEI Partition Assistant, and Paragon Partition Manager.
Why do I need third-party apps for disk partitioning?
As I already said, the third-party apps for disk partitioning provide additional features and clean UI which are unavailable on built-in operating system tools. That’s why most users prefer third-party software.