Photos are always holding immense significance in our lives. It acts as tangible memories that capture our most cherished moments. They are the visual records of our journeys, celebrations, and daily experiences.
But I know how it feels when we lose our precious photos. This is really emotionally painful. I still remember when I lost my phone data, I immediately started searching for ways to recover those permanently deleted photos from my Android device.
I tried several methods to recover my photos and in the process, I also learned about several important things that hardly anyone thinks about. There can be hundreds of reasons why such a situation may arise with you. Accidental deletion, factory reset, storage limitations, malware attacks, and hardware problems can all cause irreversible photo loss.
To all of you who have faced the headache of losing data or deleting photos, I am here to help. I will tell you all the steps required to get your photos back. I will also share tips to keep your data secure in the future. So you can keep your photos and data safe.
This article teaches us to recover Android data and permanently delete photos from our Android devices with various methods.
What To Know About Permanent Deletion on Android
When files are “deleted” on Android, they are not entirely wiped from storage. Instead, they are moved between folders, or their storage space is marked as available.Â
This is similar to how files are handled on Windows and Linux PCs. However, keep in mind that, eventually, your files will be removed. Thus, it would be best to take action as soon as you realize your photos are deleted.
Difference between permanent and temporary deletion
- Temporary deletion means the files move to a recycle bin or similar location where they can be restored. For example, many Android apps have a recycle bin which means that when you delete the photos, the files are not completely removed immediately.
- Permanent deletion on the other hand means that the files are completely deleted and cannot be recovered at all. For example, when you delete your Pinterest account, your data will be permanently deleted, and you cannot recover them no matter what methods you try.
Precautions To Take After Photo Deletion
That’s why I am saying that you should know all the safety and precautionary measures beforehand. So you can take immediate action and save your photos from getting permanently deleted. Here are some precautions you may want to consider after deleting your photos.
Stop using the device immediately:
As I said whenever you delete a file, the data from your memory is not deleted immediately. Android marks as “free” only the space where data is stored. This means you won’t find the file, and Android will consider it lost. It also means that the space that once contained that data is ready to be overwritten with new files. So, stop using your phone, taking photos, or installing new apps.
Disable automatic data synchronization:
You should disable automatic data synchronization to prevent new data from being downloaded and then eventually overwriting the space where your deleted photos were stored.
Avoid installing or updating apps:
Also, don’t add new apps or update the ones you have. This can write new data on your phone’s storage. It can take up the space where your lost photos were. So it’s better to avoid doing this.
Methods To Recover Permanently Deleted Photos From Android
Well, I have shared all the basic pre-requisite knowledge that you need to know before arriving at the solution. Now it’s time to come to our main topic, which is how to recover your Android photos. There are several ways you can do this. Here, I have collected and shared the best methods that worked for me
Method 1: Check for Backed-up Photos
Google Photos
If your phone has Google Photos installed and set up on your Android device, your deleted photos may still be in its backup. Here’s how to check:
- Open the Google Photos app on your Android device.
- Tap your account profile photo or initial at the top right.
- Tap ‘Photos settings‘.
- Tap ‘Back up‘.
- Make sure “Back up” is turned on.
If you don’t find photos in the list, tap ‘Library’ > ‘Trash.’ From there, look for deleted photos, select them, and then tap ‘Restore.’
Cloud storage services
You can also check the cloud storage services like Dropbox and sync.com if you have installed them already for photos.
To check for backed-up photos in Dropbox, follow these steps:
- Sign in to your Dropbox account on dropbox.com.
- Click the search bar at the top.
- Start typing what you’d like to search for.
- Search results will appear as you type.
- You can click one of those results.
- Click the Images tab.
To check for backed-up photos in Sync.com, follow these steps:
- Sign in to your Sync.com account.
- Click on the ‘Vault‘ tab on the left side of the screen.
- Click on the ‘Photos & Videos‘ folder to view your backed-up photos.
Method 2: Utilize Android File Recovery Software
When it comes to data recovery on Android devices, especially when you want to recover permanently deleted photos, you take benefit of one software that stands out as the best in the market- Wondershare Dr.Fone. Losing precious photos can be a sad experience. Still, Dr.Fone offers a lifeline to ensure your memories are not lost forever.
In addition to photos, Dr.Fone’s Android file recovery software can recover many other data types, including contacts, messages, videos, and more, offering comprehensive recovery options.
You can preview the recoverable photos before restoring them which ensures that you recover only those photos that you want.
Dr.Fone has a reputation for a high success rate for recovering Android photos, offering you the best chance of getting your cherished memories back.
Here is the step-by-step use of the best Android data recovery tool, Wondershare Dr.Fone.
Step 1: Launch the Data Recovery Tool
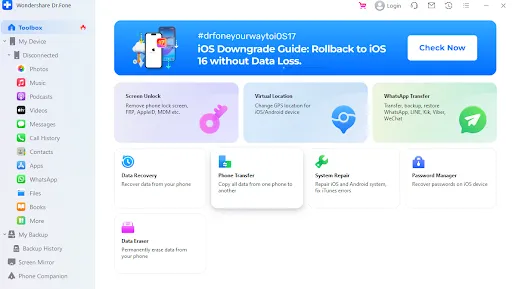
Start by opening Wondershare Dr.Fone on your computer. Once it’s open, go to the “Toolbox” section and choose “Data Recovery“.
Step 2: Choose Your Device Type
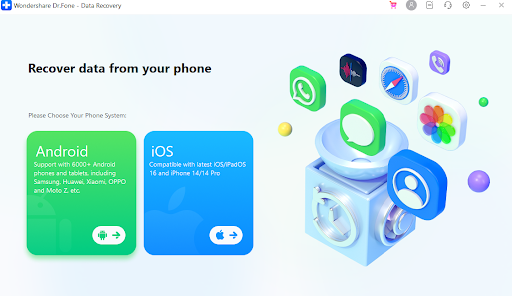
A new window will appear. Select “Android” because you want to recover data from an Android device.
Step 3: Select the Recovery Function
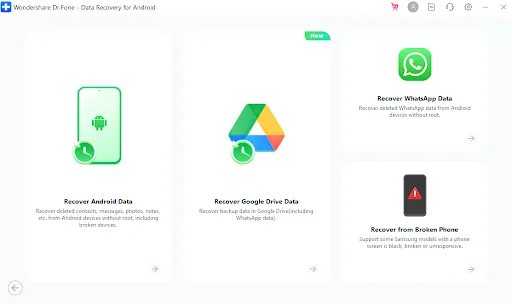
Press “Recover Android Data” from the provided options on the next screen.
Step 4: Connect Your Android Device
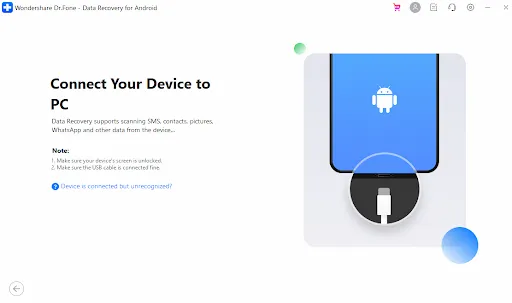
You will be asked to connect your Android device to your PC with a USB cable. Wait for the software to fetch your device.
Step 5: Choose the Types of Files to Recover
After recognizing your device, you will see a list of file types. Select the types of data you want to recover (e.g., photos, messages, contacts), then click “Start Scan“.
Step 6: Preview Recovered Data
The software will start scanning your Android device for the selected files. Wait until the scanning process is complete.
Step 7: Review Recovered Data
Once the scan is finished, you will see your Android device on the screen. You can now view all the available data. Use the filter options at the top to organize how you see the data.
Step 8: Recover Data to Your Computer
To recover the data from your Android device, click the “Recover” button. Choose where you want to save the recovered data on your computer, and then confirm the recovery process by clicking “Recover” in the pop-up window.
Here are some more popular data recovery software options:
- Disk Drill
- EaseUS MobiSaver
- FoneLab for Android
A post related to Computer: Get free Microsoft Office For Free using product keys
Method 3: Use File Explorer Apps
If you have deleted some photos on your Android phone and are looking for ways to get them back, using a File Explorer app can help. First, let’s understand how to do this.
- Download File Explorer: First, go to Google Play Store. Search for a good File Explorer app like ES File Explorer or FX File Explorer. Download and install it.
- Open App: Once the app is installed, open it. You will see many folders.
- Go to the DCIM Folder: DCIM stands for Digital Camera Images. This is usually where your photos are stored. Tap on it to open.
- Check Folders: Inside the DCIM folder, you will find more folders like ‘Camera’ or ‘Screenshots.’ Check these folders to see if your deleted photo got moved here.
- Check Other Folders: Sometimes photos get moved to other folders like ‘Downloads‘ or ‘Pictures‘. Check these folders as well.
- Search Function: Use the search bar in the File Explorer app. Type the name of the photo file if you remember it. This will help you find the photo faster.
- Check Hidden Files: Some File Explorer apps let you view hidden files. Look in the settings of the File Explorer app for an option to view hidden files. Turn it on and then search.
- Be Safe: When you’re done, it’s a good idea to turn off the ‘view hidden files‘ option if you turned it on. This keeps your phone safer.
Method 4: Seek Professional Help
If you have tried everything and still can’t recover your photos, your only option is to seek professional help. Many data recovery services specialize in recovering data from Android devices. These services have the knowledge required to recover data that may be beyond the reach of any type of data or photo recovery software.
You have to choose the right service provider, but choosing the right service can always be intimidating. That’s why I have listed some factors to consider that I personally look for when choosing any data recovery service.
- Success Rate: Look for a provider with a high success rate. For example, SalvageData has a 96% success rate in recovering data from Android smartphones.
- Cost: Consider your budget. How much you can spend on the spot? Are you ready to pay a service fee or not? You should also consider whether the service provides you with a free trial or not.
- Customer Support: Any service with good customer support always makes the service better and smoother. Dr. Fone, for example, is known for its excellent customer support.
- Reviews and Rankings: Check out rankings and reviews of the best Android data recovery software in 2023.
Best Practices for Photo Recovery and Prevention
In addition to all the steps I mentioned above, you can try several options that will help you prevent photos from being deleted from your device. Always know that prevention is better than cure.
Regularly back up your photos:
One of the best photo recovery and prevention practices is regularly backing up your photos. This can be done using various methods, such as using a data recovery app like Dr.Fone or you can also set up automatic backups on your Android device using Google Photos or your system update software like MI Cloud, iCloud, etc
You should always take regular backups to ensure that even if you lose your photos due to accidental deletion or a device malfunction, you can easily restore them from the backup.
Utilize cloud storage services:
Cloud storage services are another excellent way to prevent photo loss. Services like Google Drive, Amazon Drive, Dropbox, and Microsoft OneDrive offer automatic photo backup featuresÛ”
By saving your photos in the cloud, you can access them from any device, anywhere, as long as you have an Internet connection. This gives extra security to your photos and makes it much easier to share and transfer photos.
Install a reputable security and data recovery app:
Many people choose to Install some popular security and data recovery apps on their devices. These apps ensure that their app can help keep your photos and other data safe. They also claim that they scan your device’s storage, find lost data, and recover them.
Based on what I know, it’s good to remember that no tool can promise to get back all your lost data. If your files are completely lost or replaced by new data, it becomes really difficult to get them back.
Conclusion
When you find that you have lost your photos, you should take action immediately. As I have discussed above, when a file is deleted on an Android device, the space it occupies is marked as available for use.
New data can take up this space and you can’t get the photos back. So, stop using your phone, turn off auto data sync, and don’t add or update apps.
I know friends, losing your photos is hard but there are ways to get them back. Always keep an extra copy of your photos. Use cloud storage or trusted Android file recovery apps to do it. But it’s better to not lose them at all. Make it a daily habit to back up your photos and use the tools you have to keep them safe.
Frequently Asked Questions (FAQs)
Can I get permanently deleted photos back?
Yes, you can get permanently deleted photos back if you act fast. You can use data recovery software on your computer or visit a mobile service center. They have special tools to help you find lost files. You can also use cloud services like Google Drive and iCloud.
Can you find permanently deleted photos on Android?
Yes, it’s possible to find permanently deleted photos on Android using different methods. You can use data recovery apps, File Explorer apps, or connect your phone to a computer and use recovery software. You can also check the cloud storage services like Google Drive or iCloud